
What is this thing you call “Calisthenics Strength training”?
The definition of the word Calisthenics varies greatly. If you ask Wikipedia it says the words Kallos and Sthenos comes from the Greek and means Beauty and Strength (great mental strength, courage, strength, determination).
“It is the art of using one’s body weight as resistance in order to develop physique”.
Further on it says that Calisthenics was the physical art form used by the armies of Alexander the Great and the Spartans at the Battle of Thermopylae.
[Cool!]
More modern explanations describe it as ‘training using bodyweight as the resistance with the goal of mastering control of how one’s body moves’. Gymnastics and Acrobatics are words that describe the flavor of certain kinds of Calisthenics training while others seem to include CrossFit looking exercises, running and partner work.
I use the word Calisthenics similarly to the ancient Greek, but different. In my teaching the student work towards developing Strength of the body using their own bodyweight as the resistance, which is the result of beautiful looking Movements & Skills.
We certainly know that improvements of the physique do happen with this type of training, the ancient Greeks were not wrong!
I believe that there is an immense level of strength behind a beautiful-looking skill. The level of mastery one needs to acquire for a movement to look graceful requires many hours of practice. This practice will seep into all aspects of life, if one allows it to.
[Calisthenics, the art of using one’s bodyweight to build strength and making skills look beautiful]
Considerations for typical Calisthenics Strength training
Our body does not naturally work linearly. Our body moves in three dimensions:
The Sagittal plane – Movement forwards and backwards, which can be observed looking at a person from the side.
The Frontal plane – Movement sideways, which can be observed looking at a person from the front or back.
The Transverse plane – Movement in rotation, which can be observed looking at a person from above.
The movements of our body involve all these dimensions as we breathe and walk through life.
My stance is that the typical Calisthenics exercises are often not enough for nurturing a healthy physical body. The reasons I currently hold this stance are because the exercises tend to be more linear than they are three dimensional. They are often not taught with proper breathing techniques and it does not take our human Biomechanical patterns such as gait into account enough. With this consideration I teach Calisthenics Strength and Mobility training alongside universal human movements that otherwise would not get enough attention.
I have found that unless I include this, pain and problems may become present at a later stage due to the imbalance between work on Calisthenics skills vs. Universal human movements. Inevitably this will affect the way we can train our Calisthenics skills too.
I will elaborate on this in a separate article in the near future, but feel free to reach out if you’d like to discuss it before that happens.

Principles for developing our Calisthenics Strength skills
If we look closely, we can find principles for how to improve our skill level and promote physical growth with Calisthenics Strength training. Many of these principles are universal for strength training, regardless of the kind. When working with an understanding of principles we get an integrated picture of how we can move and grow our physical body compared to when following certain techniques perhaps from different types of teachings as we try putting them together.
Using principles makes it easier to see connections across different physical arts and interpret if a skill or technique is going to fit nicely into our own training. Sometimes these skills can even be changed based on the principles we know so that we can use them in our repertoire to make our physical development a more efficient process. I have identified six principles I would like to share with you:
Body awareness & Breath work
The more we can be aware of our body the better results we are going to get. That is because we will know how to adjust ourselves depending on the circumstance. This will make us efficient and potentially guide us away from injuries. If you have not read my article Human vs. Machine in physical training, I can recommend doing so to get a deeper understanding of this. Breath work is intrinsically intertwined in the awareness work of the body. We can use the breath to position our body well, exert more force and make movements of the body more articulate.
In summary, having a higher level of body awareness can keep us away from injuries. Breathing keeps us present and able to direction our attention on the task at hand.
Intensity & Volume parameters
In Calisthenics training, repetitions, seconds, and sets are used when programming how high or low the intensity vs. volume is. This is a good way to standardize our training to know where we are at and for keeping track on how our strength and skill levels change over time. Higher intensity means we are doing fewer repetitions and/or seconds per set and it is often accompanied by more sets and being in positions that means heavier load on the body. Higher volume means doing more repetitions and/or seconds per set and we would then do fewer sets and keep positions that are less load on the body.
In summary, using parameters such as repetitions, seconds and sets gives us a standardized way of programming intensity and volume.
Tempo
Changing the tempo aka. the duration of a repetition is a good way to bridge the gap between different exercise progressions to make sure there is enough strength gained before moving up in difficulty. Tempo is written in fours digits; “3111”. They stand for the number of seconds each phase of an exercise should take. It reads as follows for a normal push up on the floor:
The first digit (3) is the Eccentric phase, the way down to the floor in the push up. We lower down on a count of 3 seconds.
The second digit (1) is a Pause at the Bottom phase, when we are closest to the floor. We hold here for 1 second.
The third digit (1) is the Concentric phase, the way up – away from the floor. We push up for a count of 1 second.
The fourth digit (1) is a Pause again, this time at the Top phase, the end and start phase of the push up. This is also held for 1 second in this example.
Tempo is always written with the Eccentric phase first. If the exercise instead were a chin up, we would have to look at the tempo of the third digit first because we start a chin up in a dead hang. The first phase is the concentric phase in the chin up. This means we go 1s up, hold 1s at the top, then we lower down for 3s and we have 1s at the bottom before we start our second repetition.
I like using different tempos, faster or slower dependent on what phase we’re in in our training cycle. I have found tempo to be a great tool for bridging the gap between exercise progressions. It allows the student to build more strength on the same movement pattern before that pattern changes to a more advanced one. I also use tempo as a way of emphasizing the strength requirement of different phases of the exercise such as adding in an isometric hold at the top, bottom or at an in-between point of a movement.
In summary, using tempo is a great way to make an exercise more demanding and can bridge a gap between exercise progressions.

Moment arm – Body position in relation to Gravity
The force of Gravity will influence how much load is put on our body when doing Calisthenics Strength training. Sometimes changing body position as little as a couple of centimetres can make it surprisingly more difficult or easier in comparison. This comes down to physics and can be calculated through mathematics. I will not go through mathematical equations in this article. However, I will explain a few words and concepts related to this below to make it a bit clearer:
Force vectors = When we talk about force vectors, also called line of force, in Calisthenics we often talk about gravity which we are fighting against. Gravity is always affecting us in the same line, down towards Earth.
I will use the floor push up as an example to explain what force vectors mean. In the push up we start in a horizontal position to the ground. When we lower our body slowly and control it to the floor it reflects our own body’s exertion of force as we resist gravity. If we did not resist gravity it would push us down a lot quicker. We call this the ‘eccentric’ phase. This is a phase where muscle activation occurs to resist and slow down a motion where we are moving the same direction as the line of force coming from gravity.
At the bottom we resist being pushed down flat on the floor which is called an isometric muscle contraction because we are not moving. When we push ourselves back up, we are pushing directly against gravity which we call a ‘concentric’ phase and muscles will engage now to directly oppose this line of force.
At the top we keep resisting gravity by pushing away from the ground and this happens again isometrically.
As we move through the push up and work against gravity, forces will move through our wrist, elbow, shoulders, and scapula joints to meet the demands. These can be calculated with mathematics, which is done when you take a Biomechanics course at university.
There are other forces at play here such as friction, momentum etc. But for this simple explanation I would like us to take away that gravity is always a force affecting us in Calisthenics training and as we resist that we will exert force through our joints by engaging our muscles.
Axis = The axis is a point around which movement occurs. In many Calisthenics skills there are more than one axis where movement is taking place. In the push up for example we will have four joints (wrist, elbow, shoulder, and scapula joint) where movement happens.
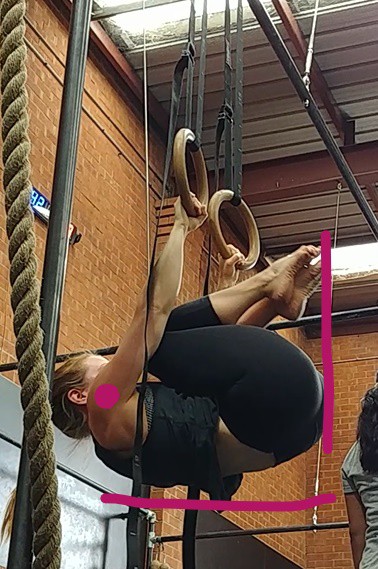
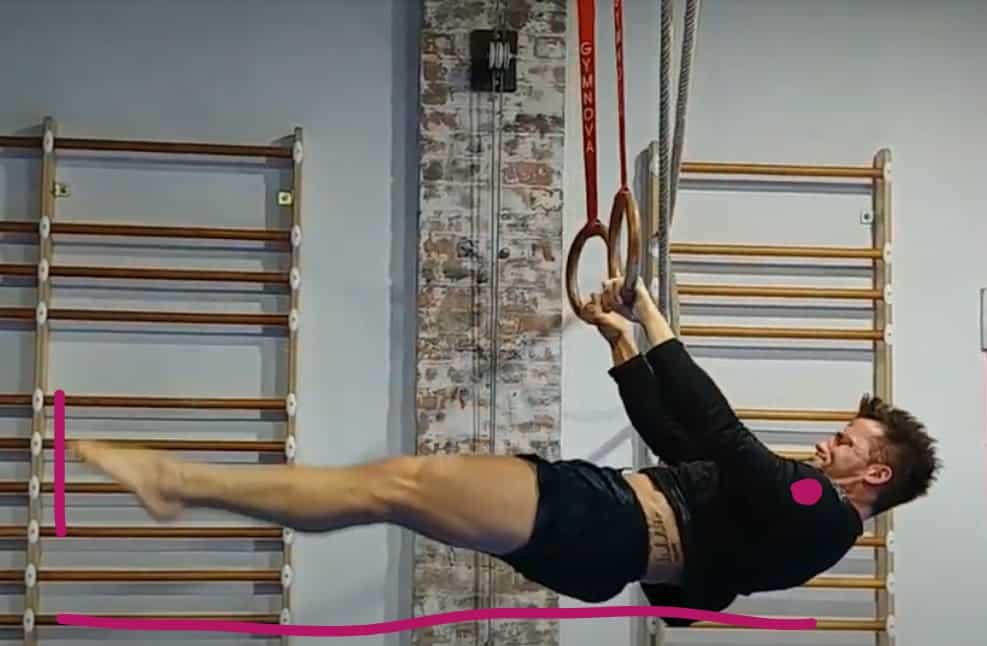
Moment arm (lever length) = The moment arm is the length between a joint axis and the line of force. If we look at the front lever exercise (the two photos below) we can see how a tuck variation makes a shorter length between the joint axis (shoulders) and the line of force (gravity affecting the person to the furthest away point of the body) compared to a full front lever where gravity in this case is affecting the person a longer distance. This means the full front lever has a larger moment arm compared to the tuck version and is because of that harder to perform.
Moment arm = joint axis x line of force (gravity)
Vs.
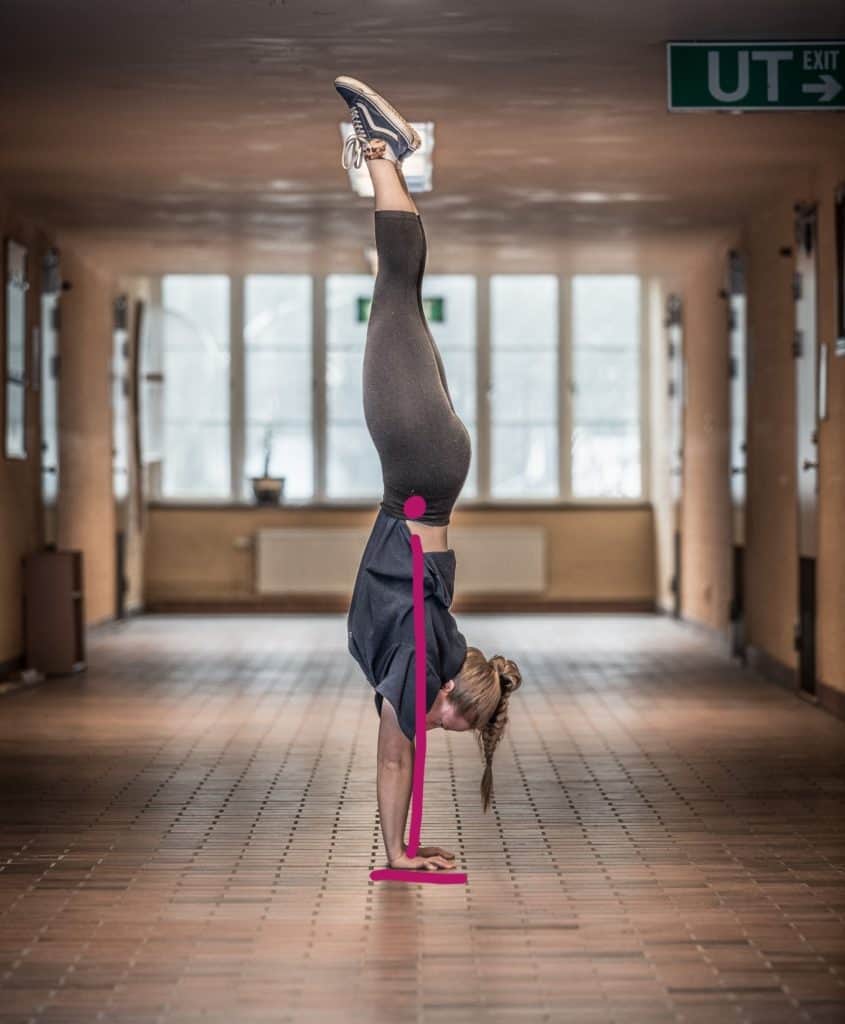
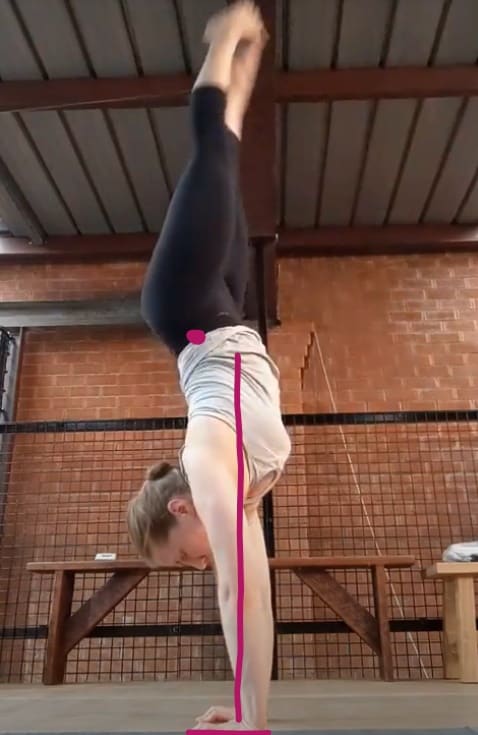
Centre of mass & Base of support = Another concept we should explore here is the placing of our Centre of mass (COM) over Base of support (BOS). This concept is interrelated with the moment arm and becomes a lot more in focus when we do single leg balance and handbalancing drills.
When standing, our COM is placed just above the sacrum/ a couple of centimeters below the belly button, aka. that is the midpoint of our mass. Our BOS is the area where we have contact with the ground. If we are balancing on one leg our BOS is the area around that one foot. If we want to stay standing, we need to make sure that our COM stays within that base. If not, it will drive us to engage our muscles more to try and keep ourselves on one foot. If the force is too great, we will fall or take a step. If we are balancing on two hands the BOS is around both our hands (see how I am placing my COM over the BOS in the first photo below) and the same rules apply; if too much of our mass ends up outside of the base of support we need to work hard to get it back into that area or we will fall or need to move our hand(s) (you can see this happening in the second photo below).
In summary, one way to progressively overload our Calisthenics training is to make modifications to our body position making the moment arm larger. We can also consider bringing the center of our body mass closer to the edge of our base of support which changes our body position in relation to gravity and will make it harder. And vice versa if we need to make things easier.
Equipment
One way to get variety in our Calisthenics training is to use different kinds of equipment.
We can differentiate stable and unstable equipment for making a hierarchy in difficulty.
Stable equipment are objects that do not move, such as high bars, dip bars, rails, stones, walls, and boxes. These are considered easier compared to unstable equipment because they are in themselves not moving, they are fixed. This makes it easier to work with compared to the below mentioned unstable objects.
Unstable equipment are objects that move such as Olympic rings, elastic bands, and balls. Unstable equipment provides a different stimulus to the body as it forces the body to provide stability to the exercise.
In summary, start with stable equipment and progress to unstable when the time is right to make the training harder or for other individual reasons unstable equipment seems more suitable.
Exercise selection & complexity
There are a few ways we can look at how to correctly select exercises and progressions.
Unilateral/Bilateral = Choosing when to use unilateral vs. bilateral movements depends on where the person is at, what abilities they currently have and what is needed for them to get to where they want to go. It is important to consider human movements such as gait where we spend a lot of time on one leg together with the person’s goals, which might be bilateral movements.
If the person has obvious side differences, then unilateral work is the go-to. Unilateral exercises are good for putting increased load and demand on the body because it means we are taking our whole weight on one leg instead of distributing it across two. Can you tell I like unilateral work?
Skill progression = This is where moment arm comes in. Different skill progressions will suit different people in different junctures of their programming. Something to pay attention to is if the student can do the minimum number of seconds or reps that is your standard for an exercise. If they cannot reach the minimum, they are not ready for that progression yet. Other principles will be better used on the progression they were at previously such as slowing down the tempo or making a small modification to the position.
Complexity = I use two main ways of increasing the complexity in training. The first one is, when a person has learnt different parts of a skill separately they can put them together and do the full movement. Working on scapula retraction and protraction alongside planks separately can for example be a good way to prepare for the full push up.
The second way is to combine several different skills into a longer sequence to make it more challenging. The Muscle Up is one such example. The Muscle Up is a combination of a chin up, the transition from the top position of a chin up to the bottom of a dip, then the full dip movement is done before transitioning back down to the top of the chin up and lowered down to a passive hang. Another example is to combine floor skills with transitions between them in a locomotive manner.
In summary, exercise selection is dependent on where the person is at. If a side difference is discovered then unilateral work is important. Working on separate parts of a skill can be useful for putting emphasis and focus where it is most needed before practicing the full skill. For a more advanced training routine we can add several skills together making it a longer sequence.
How do we apply these principles?
First, we need to know, for ourselves or the person we are coaching, where we are at (injury history, training experience, current abilities in relation to our goals and more) and where we want to go (goals both wants and needs).
Then we can look at Body awareness and Breath work together with appropriate simple Exercise progressions (this is about finding body positions in relation to gravity that are challenging for the student but not impossible) with suitable reps, seconds and sets for setting intensity and volume. That makes up the Fundamental parts of a Calisthenics program.
Something worth emphasising here is that starting with the simplest of exercise is often of great importance for creating efficient movement patterns to build on later. In regard to looking after tendons, joints and ligaments starting simple and progressing slowly is underrated for keeping healthy and making consistent gains. Do not make the mistake of progressing fast or making your training more advanced than necessary early on your training journey. There are a lot of gold to be found in simplicity.
“You can always do more tomorrow, but you can never go back in time”
With those principles well taken care of the student will make progress for quite some time before needing to look at adding variety. In situations where creating a novel stimulus is necessary for the body to keep growing, different tempos, equipment, skill progressions and combinations of skills can prove to be especially useful.
I like to think of some of the practice as physical problem solving. Putting together challenging skill combinations can certainly help with placing the student in a creative space for that to occur. This is good to start thinking about when the simple fundamental movements are learnt as they will then serve as tools for going about solving physical movements.
A student’s ability to progress safely and efficiently lies in the art of coaching. One can know all the principles but if they do not know how and when to apply them, they are not that useful. Like many things, Calisthenics training is mostly about How, not what.
Experiment with these principles to learn what works best for you. If you need guidance, you can contact me here.
Enjoy your Calisthenics training!
[FT]